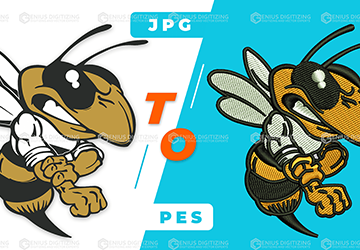
Detailed Guide To Vector Tracing
In the world of digital design and embroidery, achieving the highest quality results is paramount. Enter vector tracing, a crucial technique that transforms ordinary raster images into versatile and scalable vector graphics. Whether you're a graphic designer seeking to enhance your creations or you represent a business in need of embroidery-ready artwork, mastering vector tracing is essential. In this detailed guide, brought to you by Infinum Digitizing , we'll explore the intricacies of vector tracing, the difference between raster and vector images, and provide step-by-step instructions on how to perform vector tracing using popular software.
"In the world of embroidery, precision is paramount. Vector tracing empowers us to turn imagination into intricate designs, seamlessly blending artistry and technology." — Infinum Digitizing
Understanding Raster vs. Vector Images
Understanding Raster and Vector Images: Before we dive into the intricacies of vector tracing, it's crucial to comprehend the fundamental distinctions between raster and vector images.
Raster Images:
Raster images are composed of tiny pixels, with the quality and dimension of these pixels often measured in megapixels. However, the rigid, pixel-based structure of raster images limits their scalability. Enlarging or shrinking a raster image can lead to a loss of quality, commonly referred to as the "blurring" effect. This limitation poses challenges for graphic designers and the embroidery industry when working with raster-based images.
"Raster images have their charm, but for scalability and perfection, vector images are the artisans' choice."
Vector Images:
In contrast, vector images are created using mathematical lines, allowing them to be scaled to any size without compromising quality. This flexibility makes vector images a preferred choice for professionals, including graphic designers and the embroidery industry, as they can be resized as needed without loss of quality.
"In the hands of a skilled designer, a vector image is not just lines and shapes; it's a canvas of endless possibilities."
The Vector Tracing Guide
Now that you understand the significance of vector images, let's delve into the process of vector tracing using software.
Selecting the Right Vector Tracing Software
Choosing the appropriate software is crucial for effective vector tracing. In this guide, we'll focus on CorelDRAW Graphics Suite and Adobe illustrator, a widely acclaimed vector softwares known for its comprehensive set of tools.
"CorelDRAW and Adobe Illustrator: where creativity meets precision in the world of vector tracing."
Vector Tracing in CorelDRAW Graphics Suite
Step 1: Import the Raster Image
Begin by opening the raster image in CorelDRAW Graphics Suite. To do this, go to "File" > "Open" and select your image file.
Step 2: Access the Image Trace Tool
With the image in your document, open the "Image Trace" window by navigating to "Window" > "Image Trace." Ensure your image is selected for the tracing options to become available.
Step 3: Black and White Vectorization
For a monochrome vector, select "Mode" > "Black and White" from the drop-down menu in the Image Trace panel. Click "Trace" to convert your image into a black and white vector.
Step 4: Adding Color
To create a colored vector image, undo the black and white trace by selecting "Edit" > "Undo Image Tracing." Now, choose "Mode" > "Color" and select "Palette" > "Limited" for a controlled color palette. Adjust the "Colors" slider to your preference and click "Trace."
Step 5: Refine and Edit
After tracing, you may need to refine and edit the vector result. Click "Expand" to start editing paths, shapes, curves, and colors as needed.
Step 6: Save and Export
Lastly, save your vectorized image by going to "File" > "Save." You can export it in various formats, such as EPS, CDR, or SVG.
Congratulations, you've successfully performed vector tracing in CorelDRAW Graphics Suite!
Vector Tracing in Adobe Illustrator:
Vector tracing in Adobe Illustrator is similar but offers more options for complex images. Here's a step-by-step guide:
Step 1: Choose Your Image
Import the Raster Image Begin by placing the raster image in Adobe Illustrator and embedding it. Ensure you have the image selected.
Step 2: Crop the image
Crop the Image To focus on the specific area you want to vectorize, use the Crop Image option and crop the image accordingly. Click "Apply" to confirm the crop
Step 3: Open Image Trace
Access the Image Trace window by going to "Window" > "Image Trace and choose the tracing option that best suits your needs. "High Fidelity Photo" closely resembles the original image, while "Low Fidelity Photo" offers a more cartoonish look. Experiment with other options and adjust details as needed.
Step 4: Black and White Vector
Better to start by converting the image into a black and white vector by selecting "Mode" > "Black and White" and clicking "Trace."
Step 5: Limited-Color Vector
Undo the black-and-white trace, then select "Mode" > "Color." Choose a limited palette and adjust the Colors slider.
Step 6: Trace the Image
Click the "Trace" button in the Image Trace panel and be patient, especially with complex images.
Step 7: Refine Your Vector
Expand the Image Click "Expand" to convert the image into vectors. You can then ungroup the image to edit individual components, such as removing the background or making adjustments.
Step 8: Save Your File
It's time to save it in a vector format to preserve its quality. Adobe Illustrator supports various vector formats like PDF, AI, EPS, and SVG. For versatility and wide compatibility, we recommend saving your vector image as an SVG.
To do this, navigate to File > Export > Export As, provide a title for your file, and select SVG from the format dropdown menu.
Conclusion
Vector tracing is an invaluable skill for professionals in design and embroidery, allowing for the creation of high-quality, scalable graphics. By understanding the differences between raster and vector images and mastering vector tracing using software like CorelDRAW and Adobe illustrator, you can elevate your design game and deliver exceptional results for your clients. With Infinum Digitizing , your journey to creating outstanding vector graphics begins now. Start with simple images, practice, and gradually tackle more complex projects to unlock your full potential in the world of vector tracing.
"From pixels to perfection: the journey of vector tracing." — Infinum Digitizing