How To Vector An Image Into Illustrator?
Introduction
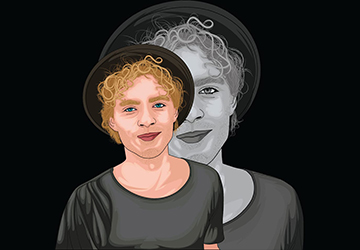
In the world of graphic design, images come in two primary formats: raster and vector. While raster images consist of individual pixels and are rich in detail, they have a limitation – they lose quality when enlarged. On the other hand, vector images are created using lines and shapes, making them highly scalable without any loss in quality. If you want to edit a raster image in Adobe Illustrator, you first need to convert it into a vector image. In this tutorial brought to you by Infinum Digitizing, we will explore two methods for vectorizing images in Adobe Illustrator: using the Pen Tool and the Image Trace feature.
"Infinum Digitizing: Where Raster Meets Vector, and Imagination Knows No Bounds."
What is Vector Image?
Before diving into the conversion process, it's essential to understand what a vector image is. Unlike raster images, which rely on square pixels, vector graphics use scalable color polygons. These polygons are defined by mathematical formulas, making vector images resolution-independent. This means you can resize them without losing quality.
Vector images are typically saved in formats like SVG, EPS, or AI, while raster images are commonly found in JPG or GIF formats.
"Vectorization is the key to unlocking the full potential of digital images. It transforms static, pixelated visuals into dynamic, infinitely scalable assets that retain their sharpness and clarity at any size."
Method 1: Image Trace
The Image Trace feature in Adobe Illustrator provides a quick and easy way to vectorize a raster image, especially when the image isn't too complex. Follow these steps:
"Effortless Vectorization: The Image Trace Way - Infinum Digitizing"
Step 1: Import the Raster Image Begin by placing the raster image in Adobe Illustrator and embedding it. Ensure you have the image selected.
"Image Trace: Where Art Meets Automation."
Step 2: Crop the Image To focus on the specific area you want to vectorize, use the Crop Image option and crop the image accordingly. Click "Apply" to confirm the crop.
"From Raster to Vector: A Quick and Easy Transformation."
Step 3: Apply Image Trace Now, click on the "Image Trace" option and choose the tracing option that best suits your needs. "High Fidelity Photo" closely resembles the original image, while "Low Fidelity Photo" offers a more cartoonish look. Experiment with other options and adjust details as needed.
"Mastering Image Trace: Precision at Your Fingertips."
Step 4: Expand the Image Click "Expand" to convert the image into vectors. You can then ungroup the image to edit individual components, such as removing the background or making adjustments.
"Vectorizing with Precision: Unleash Your Creative Potential with Infinum Digitizing."
Step 5: it's time to save it in a vector format to preserve its quality. Adobe Illustrator supports various vector formats like PDF, AI, EPS, and SVG. For versatility and wide compatibility, we recommend saving your vector image as an SVG.
To do this, navigate to File > Export > Export As, provide a title for your file, and select SVG from the format dropdown menu.
"With your image successfully converted into a vector format, you're now equipped with a versatile asset that can be used for anything from business logos to billboards. The possibilities are limited only by your creativity."
Method 2: Pen Tool
For more precise control over vectorization, especially when dealing with complex images, the Pen Tool can be a valuable tool. Follow these steps:
"Transforming Pixels into Perfection: Infinum Digitizing's Guide to Image Vectorization."
Step 1: Adjust Opacity and Create a New Layer Select the raster image and lower its opacity to around 70%. This step helps you see the image while you trace it. Create a new layer to draw/trace the image using the Pen Tool.
Step 2: Use the Pen Tool Select the Pen Tool from the toolbar, choose a stroke color, and set the Fill to None. Begin tracing different parts of the image, using different stroke colors for different color areas. Lock each path when you finish tracing it.
Step 3: Color the Image After tracing all parts of the image, unlock the paths and use the Eyedropper Tool to sample colors from the original image and apply them to the vector image. Adjust and refine the vector image as needed.
Step 4: Finalize and Edit Use the Direct Selection Tool or Eraser Tool to clean up and finalize the vector image. You can add more details or modify colors as desired.
Step 5: it's time to save it in a vector format to preserve its quality. Adobe Illustrator supports various vector formats like PDF, AI, EPS, and SVG. For versatility and wide compatibility, we recommend saving your vector image as an SVG.
To do this, navigate to File > Export > Export As, provide a title for your file, and select SVG from the format dropdown menu.
"Remember, a well-maintained vector image is your master copy, your digital legacy. It's the file you can revisit and modify, ensuring that your artwork remains as vibrant and impactful as the day it was created."
Conclusion
Vectorizing an image in Adobe Illustrator is essential when you need to work with raster graphics. The Image Trace feature offers a quick and straightforward way to convert images into vectors, with options like "High Fidelity Photo" providing results closest to the original. For more precise control and customization, the Pen Tool allows you to create vector graphics tailored to your style.
"Vector Magic, Made Simple: Learn the Art of Image Vectorization with Infinum Digitizing."
Infinum Digitizing specializes in vectorization services, ensuring your images are converted to high-quality vectors suitable for various applications. Whether you choose the convenience of Image Trace or the precision of the Pen Tool, Adobe Illustrator offers the tools you need to work with vector graphics seamlessly. With vectorization, your graphics can be scaled to any size without compromising quality, making them versatile assets for your projects.
"Infinum Digitizing: Where Raster Images Find Their Path to Vector Brilliance."